


Solar Wireless Lightning Detection Sensor - WeatherSense
These are kits that are easy to build and require NO SOLDERING! You can do this easily with your kids. 100% SkyWeather2 Compatible.
How to Choose your SkyWeather2 Kit
Check out the buyers guide here.
For more information about WeatherSense - Tutorial: What is WeatherSense?
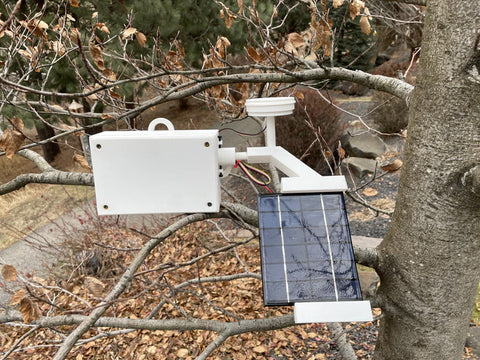
Ka-boom. We all know what thunder sounds like. Crack. We all know what lightning looks like. How can we get our Raspberry Pi to see the lightning? We do that with the new WeatherSense Lightning Detector. The solar powered lightning detector sniffs out the lightning up to 30km (18.75 miles) away and reports it back to your Raspberry Pi safe inside the house using 433MHz radio technology. This sophisticated sensor can detect the difference between local sources of EMF (Electro Magnetic Frequency) noise and the real bolts of lightning. Why do we want it outside? Because your house, monitors, phone, computers and the Raspberry Pi itself are sources of electrical noise that makes it harder for this sensitive lightning detector to do its job. And we have designed the system to just sip (Solar!) power and send back necessary reports to your Raspberry Pi for your display and analysis.
What is WeatherSense?
WeatherSense is an open source wireless protocol for sending information from remote sensors to your Raspberry Pi. This kit comes with the software you need to receive the WeatherSense messages using your Raspberry Pi and Software Defined Radio (SDR).

Solar Powered Wireless WeatherSense Lightning Sensor Kit Contents
This is the complete kit for the Wireless Lightning Sensor. Add ons to this kit include a SDR (Software Defined Radio) for your Raspberry Pi, a 3D Print, Lightning Simulator, and pre-loaded SD Card. Raspberry Pi is not included. A 3.7V LiPo Battery is not included.
The Lightning Sensor Kit contains:
-
Mini Pro Plus Arduino Compatible Low Power Computer
-
433MHz Transmitter Board with Inside Antenna
-
ThunderBoard AS3935 Lightning Detector
-
50cm Grove Cable
-
330mA 6V Solar Power Cell
-
SunAirPlus2 Solar Power Controller and Data Collector
-
20cm Grove Cable
-
Short USB A to USB Micro Cable
-
Links to Full Documentation and Assembly Instructions
- Links to all Source Code
What else do you need to use these kits?
- A Raspberry Pi (Pi 4B, 3B+, PiZeroW tested and work)
- A Compatible Software Defined Radio (We have one in stock but you can get one in many places on the network)
- 3.7V LiPo Battery - See documentation for suggestions - such as https://www.adafruit.com/product/353 - if you get them off of Amazon, check the wiring most of them are wired backwards - Fully discussed in manuals. Here's a great website showing the problem: https://docs.particle.io/tutorials/learn-more/batteries/
WeatherSense Raspberry Pi Software
But wait! There is more. The Wireless WeatherSense kits come with a full set of open source software for your Raspberry Pi. You can download the software from github.com/switchdoclabs or add-on a pre-formatted SD Card with all these goodies already on the card for a simpler experience. See downloads below.
The WeatherSense Raspberry Pi software includes:
-
All messages published on MQTT (topic: weathersense/#)
-
Installed rtl_433 433MHz open source drivers
-
WeatherSense open source database program - stores your data!
-
A dash_app ready to display and analyize your data from all the WeatherSense sensors!
The WeatherSense software supports:
-
WeatherSense WeatherRack2
-
WeatherSense Indoor T/H Sensors
-
WeatherSense AQI Sensor
-
WeatherSense Lightning Detector
-
WeatherSense WeatherCam (Coming soon)
-
WeatherSense SolarMAX2 Solar Power System and Controller (Coming Soon)
And more WeatherSense sensors on the way!
Downloads
- Step-by-Step Lightning Assembly and Test Manual
- Step-by-Step Lightning WeatherProofing and Test Manual
- Arduino Open Source C/C++ Software for the the Lightning Detector
- 3D Print STL Files for the Lightning Detector
- Raspberry Pi WeatherSense Open Source Software for data collection and visualization
- Full spec for lightning board AS3935
What is a Software Defined Radio?

A Software-defined radio (SDR) is a radio communication system where components that have been traditionally implemented in hardware (e.g. mixers, filters, amplifiers, modulators/demodulators, detectors, etc.) are instead implemented by means of software on a personal computer or embedded system (still with significant hardware support.)
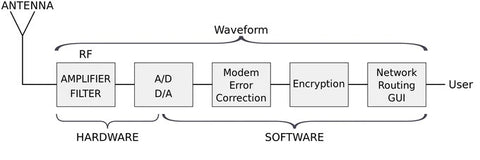
The SDR we are using with WeatherSense is based on the powerful RTL2832U and R820T tuner, it can tune into signals from 24MHz to 1850MHz. SwitchDoc Labs has written drivers for the WeatherSense sensors and supplies the drivers to the community open source. These are all available in a pre-built SD Card image.
How does the Lightning Detector work?
How the heck do we detect lightning? You would think it would be pretty easy, but it turns out it is not. It's not just like a giant spark. Well, it is a giant spark, but there are lots of other things that make electrical noise that can be confused for lightning. Your computer (even your Raspberry PI and Arduino!), your car, the motor in your refrigerator, your cell phone, your computer monitor, your AM/FM radio and even your TV. They all make electrical noise that can be confused with Lightning.
The Thunder Board detects Lightning and provides a distance estimate to the “leading edge” of an incoming storm. The phrase “leading edge” is a bit misleading, since it suggests that one is in the direct path of the storm. In fact, for the purposes of the Thunder Board, the leading edge is simply the closest edge of the storm, which may never actually arrive if the storm delivers a glancing blow nearby.
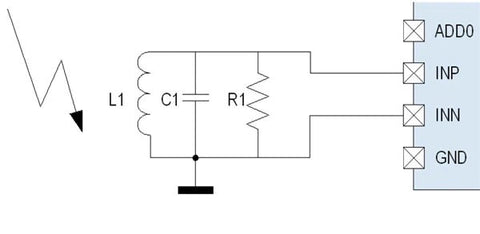
However, its distance away from you – regardless of where it is heading – is the most relevant information. A lightning strike creates an electromagnetic pulse that can be detected using an external antenna tuned to 500 kHz, with a bandwidth of 33 kHz. An analog front-end (AFE) demodulates and amplifies the antenna signal, and a watchdog circuit alerts the lightning detector once an event crosses its threshold. However, numerous other electromagnetic events create high-energy events. It is important that such non-lightning “disturbers” not be misinterpreted as lightning – and vice versa.
We then decide whether the event has the characteristics of a lightning strike. If not, it is rejected as being the result of a disturber. If it decides that it is lightning, the energy of the event is calculated and stored, and then the storm distance is calculated based on that and prior events. An interrupt then completes the process so that the Arduino or Raspberry Pi can retrieve the information and take action.
Sounds like magic? It's not. But it is pretty cool that you can build a kit that does this.
John has created a video explaining how the lightning detector works and how to tune it.